

Friday, I had my first post-op appointment with my orthopedic surgeon.
My surgeon has the BEST bedside manner, y’all. I count him and his staff among my many blessings.
I thought I’d share details about my surgery during Friday’s visit.
First, though, look at my shoulder.
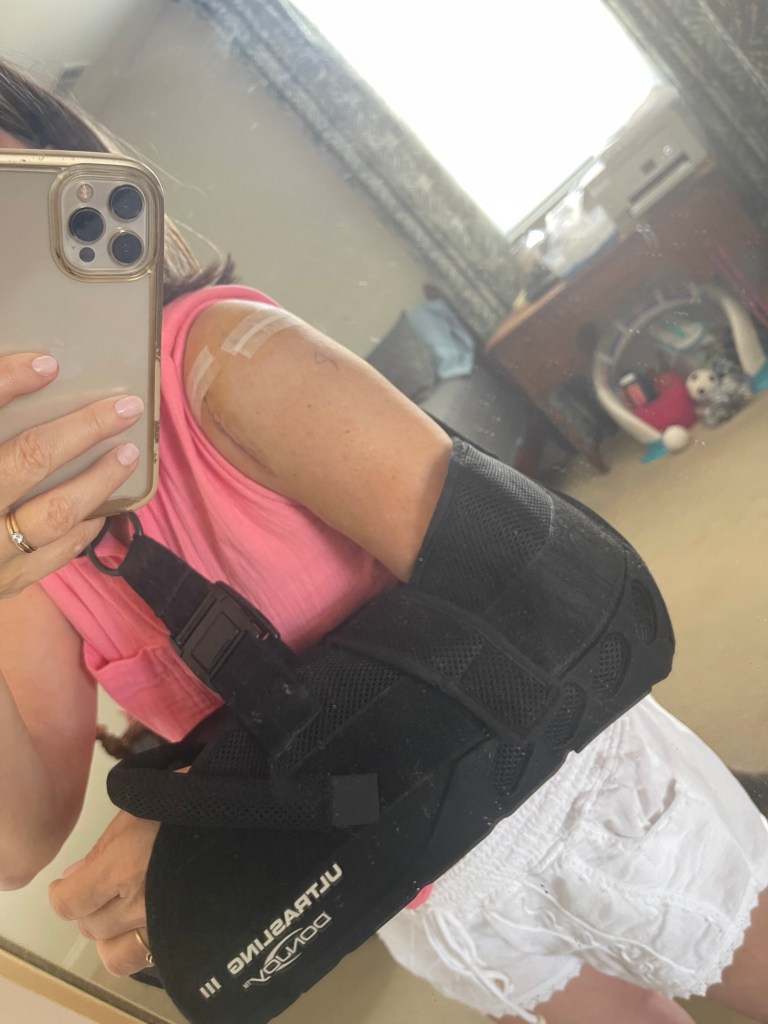
No more stitches! I had one incision I was a tad nervous about because it had a knot, but it smoothed over as soon as the nurse pulled out the stitch (which hurt coming out, by the way).
The steri-strips will eventually fall off on their own.
I am not allowed to scrub my shoulder (nor would I want to), but it’s now okay for my shoulder to get wet. Now, I’m not going to soak in a pool, but simply running soap and water down my arm is allowable.

The doctor had visited me in the recovery room after my surgery and gave me two sheets of photos. I took them with me to Friday’s appointment and asked if he would describe each one.
He’s a saint, let me tell you, and acquiesced to my request.

Photos 1, 2, 4, and 5 are of my labrum BEFORE he repaired it.
He said it was shredded. He said you can see it from the way the wispy tissue was floating around.
Photo 7 is my labrum and the socket AFTER he released the bicep muscle from the labrum.
The bicep muscle was then attached to my humerus bone with an anchor. That’s not in the photo, but it is why I have a long incision down my bicep. He always fixes that injury with an open incision.
I’m not sure, but I think photo 8 is of my rotator cuff. It seems to look a little like the rotator cuff photos in the next grouping.
Before I leave the first group, though, photo 6 is of the section of arthritis, which he smoothed over. I didn’t even know that could be done.
Here are photos 9-16.
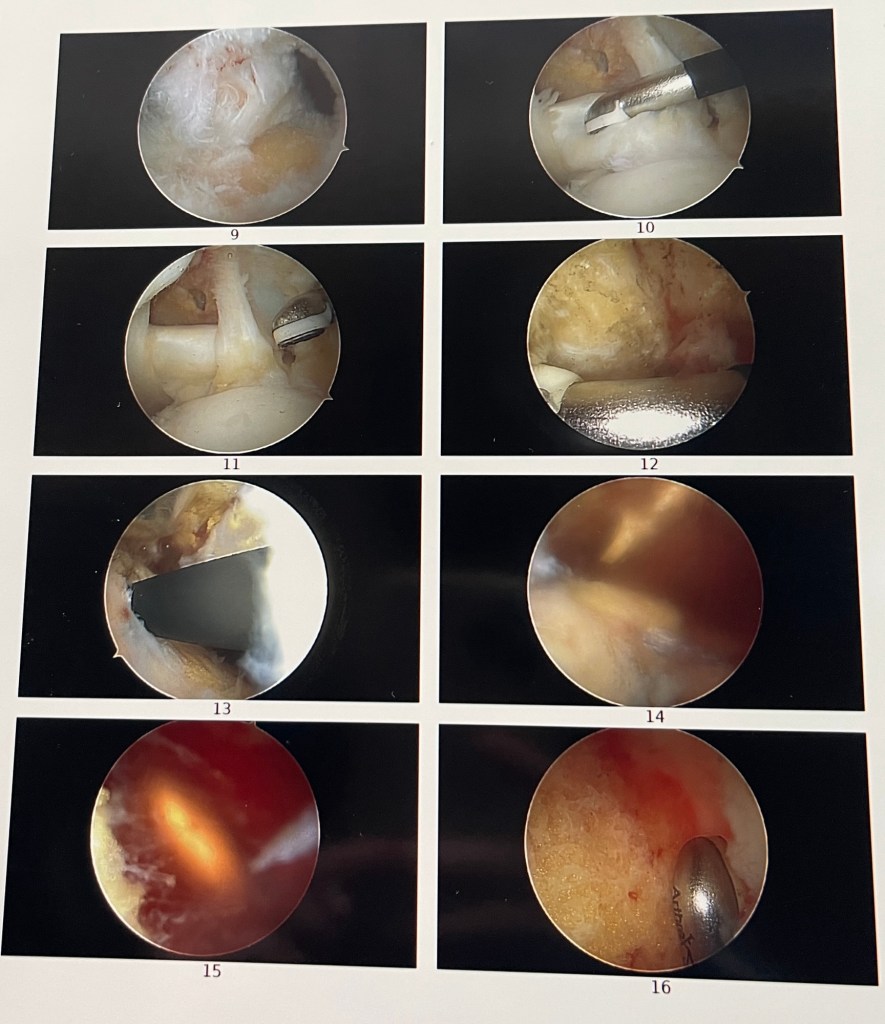
Photo 9 shows a complete rotator cuff tear.
When describing photo 10, my doctor referred to it as a subscap tear. Here’s a link to read more about this kind of rotator cuff tear.
I had every single one of the symptoms, which my surgeon had attributed to my labrum after getting my MRI results, which initially didn’t show much of a rotator cuff tear. I’m going to sound like a broken record, but I am SO GLAD I pushed for surgery so quickly. There’s nothing like putting eyes on an injury.
Here’s a diagram I found online of the muscles of the shoulder. I found it helpful when I got home and looked it up because there are a lot of moving parts inside the shoulder.

Is it any wonder why I had been in so much pain? Yikes!
Photo 11 shows the rotator cuff after he repaired it.
He described how the procedure worked. After seeing the torn tissue, he scraped back, looking for good tissue. He had to keep scraping back. The official term for this is debridement, which is the removal of damaged tissue. I had seen the word on my surgical papers but now fully understood what it meant.
Since there wasn’t enough undamaged tissue left to build on, he completed the tear, which was already at 50%, and repaired it from there, putting it back together with an anchor.
Photo 13 shows the rotator cuff before the repair, and photo 14 shows it afterward (it’s kind of fuzzy because of the blood that leaked into the cavity).
So much ouch in that. I’m so glad I was dreaming all of the things while all of that was happening.
But there’s more!
Going back to photo 12 – my doctor removed a bone spur. I think he shaved it down.
Photos 15 and 16 show where he also shaved down part of my collar bone.
I find it amazing that I’m doing so well considering all of the crazy stuff that was done to fix my shoulder.
It’s also no mystery why they say that shoulder surgery is one of the most painful.
I asked my surgeon how to avoid these kind of injuries in the future.
He said that rotator cuff injuries typically happen from eccentric movements – the negative contraction when your rotator cuff is trying to slow down the motion of your arm. It’s when the muscles are lengthened while under tension.
It’s why pitchers often have rotator cuff injuries, as well as people who brace their falls by holding out an arm.
Honestly, I don’t remember him telling me how to avoid this. I think that’s where the physical therapy and strength training come in.
He said that it’s rare to re-injure a labrum after the type of repair we did – bicep tenodesis. Because the bicep is relocated to the shoulder bone, it’s no longer pulling on the labrum, which is what leads to a labrum tear.
That information gave me a lot of peace of mind.
I go back for my next follow up in a few weeks. I’ll be monitored closely for several months until the doctor is sure that our goal – full recovery – has been met.
I really appreciate your patience with all of these posts about my surgery. This is incredibly helpful for me as I process all of this. I want to have something to reference later because the smaller details will slowly fade from my memory.
I like looking back and seeing how God carried me through each trial in my life.
Filed under: This-n-That |

The shoulder is definitely a complicated joint and you had definitely messed up yours. Hopefully it will be so much better when you’ve completed all the PT and the wounds and internal repairs have had a chance to heal.
You’re not wrong! It will definitely be better – stronger too, I hope!