Another project magically jumped on and off of my needles in the span of three days.
This is the Warm Stripings Hat from the January 2008 issue of Creative Knitting.
Chicky’s friend called me earlier last week, and we had the following conversation…
“Mrs. AuburnChick, I know what you can get me for my birthday.”
“Oh? I didn’t know I was getting you anything, but pray tell, dear Friend of Chicky, what would you like?”
“I want a hat with ear flaps and fuzzy things on the ends.”
I immediately thought of the Warm Stripings pattern because I made it a year and a half ago for another one of Chicky’s friends.
Now, I tend to be a monogamous knitter; however, the holiday season has thrown major wrenches into my normally organized life. I keep coming up with new projects to work on with short deadlines (the request for this hat had a due date of mid-December).
And yet, after purchasing the yarn last week while on the way to Chicky’s soccer game, I couldn’t wait to cast on!
The yarn is an acrylic blend and deceptively soft. It comes in 100g skeins, but I only needed 90g to finish the hat. I probably could have gotten away with 85g if I had not knit the i-cord for the top, which I wound up not using.
Folks…this is the perfect project if you’re looking for something fast and easy. I knocked this out between Friday and Sunday evenings.
Chicky called her friend and invited her to stop by the house after youth.
I was a little concerned that she would like it because Chicky didn’t exactly give me the feedback I was looking for when I was finishing it up.
After listening to a couple of Chicky’s comments, I decided to do a quick revamp and added the pom poms on the ends and the one on the top.
Chicky’s friend came over, and I was a nervous wreck (as I always am when gifting knit items).
No worries though, as you can see from her face (permission to post granted by her mom)…
She said she doesn't do hats well. I think she's pulling this one off perfectly!
See the pom pom on top?
I think she likes the hat.
Happy Birthday Chicky’s Friend. You are like a daughter to me, and I love you.
Do you remember my mention of Knitting for Hope? This project was started a few months ago by my friends Rae, Rabbitrescuer, and Figaro.
Fig’s mom lives and works on a reservation in California. There is a great need for baby items. It was my friends’ hope that they could encourage expectant mothers to visit the clinic for much-needed pre-natal care.
I sent Fig a hat and bootie set, which I blogged about here…
Knitting for Hope took a few weeks to get going, but now there are a number of people sending items. Fig’s mom has been able to put care packages together and is sharing these items with other clinics in her area.
Fig sent me a picture of one such package…
Do you see anything familiar?
My hat and bootie set!!
I am touched beyond words.
Once again, I see how God is using my hands to touch others, and I am humbled. It is an honor to serve Him by serving those here on earth.
Two days off from school this week gave me time to paint the toes...
...and to file coupons...
Several batches of cookies were baked in the AuburnChick home this week. Rooster scored two before I could pull out the camera. You've gotta be quick in this house.
Aubie loves the new bedding I gave the dogs.
Pele prefers the couch...
Molly saw some couch action as well...
...especially while "nuggling" with Chicky.
Another sample arrived in the mail this week...
Yarn shopping...
...for gifties...
...on the way to the soccer game...
...where we won 3-1!!
This is my attempt at being organized for next week's classes. Do I have "teacher handwriting" yet?
Once upon a time there was a fair-haired girl named Chicky.
Chicky had a friend named Happy who always had a way of bringing joy to those around him.
One day, Happy became sad when his Papa became sick.
Chicky visited their castle and inquired how she might be of assistance, making special mention of the skills that her mother, Duchess of Knitting, possessed.
“Does she make stuffed animals?” Happy’s mom asked.
“The Duchess is very talented. Your wish is her command,” and she carried the request back home to her very beautiful mother.
The Duchess found the perfect pattern (Frog Prince by Alan Dart) in a magazine she had stowed away (Simply Knitting – March 2009).
The Duchess then visited her local market, picking up some Vanna’s Choice in Olive and Dusty Green (we all know that Vanna’s been around for a very long time) along with some I Love This Yarn in Buttercup and Forest.
She toiled late into the night…several nights, in fact, and produced a work of art even a king would be proud of…
The frog’s crown is a reminder that there is a Great King who rules over the land, keeping watch over His children…
Chicky and the Duchess hope that every time Happy and his Papa look at the frog, they will remember to Fully Rely On God (see the acronym)…especially during this time while Papa is sick.
As the frog has great big eyes that see all, so does our Heavenly Father, who loves each one of us and keeps a close eye on each of His children…
This weekend, we’re in Atlanta, which cannot go by the nickname “Hotlanta” cause it’s FREEZING!
When we left home (i.e. Florida) at 6:30am, it was 50 degrees. My phone has a weather application, and I checked it as we traveled.
When we hit Dothan an hour and a half later, it was 47 degrees. Say what? Isn’t it supposed to warm up as the day progresses?
We hit Eufaula awhile later, and it was still hovering around 49 degrees.
Lovely.
We got out to eat in Columbus, Georgia, and the wind was blowing. And it was COLD. We didn’t dawdle.
We arrived in Atlanta around 1pm, and I’m telling you…it felt colder than an hour before. Chicky lives for cool weather, but she commented that while yesterday’s weather was nice (the temperature was just starting to fall), today was plain old cold.
Brrr…
Now, let’s talk about the hotel.
It’s the Courtyard Marriot in East Point, GA (Atlanta Airport West), and it’s FABULOUS! Oh my gosh! When we walked into our room, here’s what we saw…
The little details, such as plants, lighting, and TV/desk areas change a hotel room from passable to uber-comfy…
A nice bathroom is bonus…
Look at the shower! I LOVE the little seat area. It’s great for setting your shampoo bottles on!
Before we headed out to the field, we saw that we had time to relax, so I kicked off my shoes.
Notice anything?
Yep…a hand-knit pair of sock…of course…
These are the Hawaiian Leis Socks I finished in February. I blogged about the details here.
The little bit of lace makes the socks just a little thicker than your ordinary vanilla pattern socks, adding a warmth that I wanted for today. The yarn is super-soft.
When people see me knitting socks, they usually say one of two things:
1) Why are you making socks, when you could buy them cheaper? Well, because this way they fit ME perfectly, and they are much nicer than regular socks. Plus, they are different from any you can buy.
2) Do you really think you’re going to use all the socks you make? You live in Florida. Um, we get cold in Florida too. In fact, Floridians get cold when the temperature drops to 75 degrees.
I’ve had some great questions since posting my felting tutorial yesterday.
Kelly wanted to know what the difference is between eyelets and grommets?
Glad you asked, since I just found out myself!
Eyelets have two pieces: a washer with a barrel attached (much like a grommet), and a washer with teeth…
One eyelet set
Grommets, on the other hand, have sets containing washer/barrel combos and domed washers with no teeth…
One grommet set
From what I can surmise, eyelets are useful for “grabbing” and adhering to material. Grommet parts get “smooshed” onto the items they are being attached to and adhere by being crimped together.
Kelly also asked why one of the bags required more yarn than the other.
Hmmm…I wondered that myself. I think that one reason was that the strap of one bag was shorter than the other bag.
Maybe.
I did weigh the bags before they were felted, so I know my numbers are correct.
It could be that the difference in the yardage/weight was due to the varying thickness of the yarn. Noro Kureyon is notorious for having thick and thin sections. It can take a little getting used to, but when things are felted, it really doesn’t matter a whole lot as far as appearance goes.
Another reason could be tension.
I might have had a tighter tension for the second bag (I was subbing when I knit half of it). When you knit tighter, you use less yarn…especially when you’re making multiple projects using the same pattern and are going by round count instead of measured “done-ness.” By that, I mean that I didn’t knit the bag (unfelted) to certain dimensions.
Three skeins will give you ample yarn for your project. I suggest knitting the straps a full six feet in length. It’s a pain to do i-cord for that long, but it ensures you get one suitable to hang over your shoulder.
Another reader commented that it was too bad I couldn’t sell these bags.
Yep…it is too bad, but I’m going to honor the designer’s requirements. She freely offers this pattern — at no cost to the knitter. One of the main requirements is that the project is not made for resale.
If you are looking for a place to purchase the yarn, I suggest Hook ‘n Needle. I purchased the pink Noro during one of my soccer trips to South Carolina.
The owner does not have a website, but she gladly takes phone or email orders. She is a lovely lady…does business the old way. She said she gladly ships without taking payment first. She uses the honor system and asks the buyer to add on the cost of shipping when sending payment (she includes an invoice in the package without factoring in the shipping).
Talk about trust!
Here’s the contact info for the shop:
Hook ‘n Needle
28 Diamond Lane
Intersection Center
Columbia, SC 29210
803-772 1335
One last piece of advice.
Before you begin this project, I suggest you wind all three skeins of yarn into one big yarn cake. These were the first two bags I did this for, and I found it much easier to match up the striping, tie the yarn ends together, and go from there. I stuck the yarn cake in a large, plastic storage bag and knit from there to keep dog hair off of my project.
Good luck to you and let me know if you have any questions!
But, I had good reason! I was busy finishing up a couple of projects and working on my super-secret project.
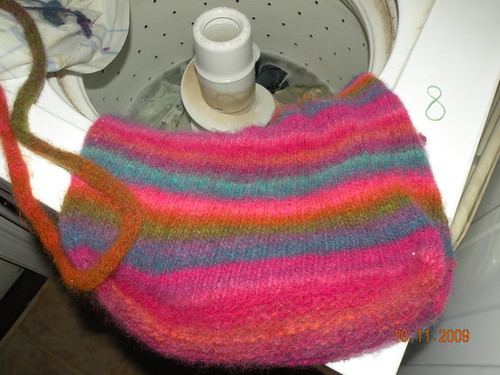
I’ve mentioned how I’m working on two Black Sheep Booga Bags. Well, I’m happy to report that they are now FINISHED! Woo Hoo! (insert happy dance)
Before I started felting them, I thought to myself…”AuburnChick, some people out there either don’t know what felting is or are too intimated to give it a try. Why don’t you show your faithful two readers (and anyone who might accidentally stumble on your blog) how it’s done?”
“Ok,” I said to myself, since not too many people tend to answer me back IRL (in real life).
WARNING: This post is VERY picture-heavy. I couldn’t help myself. I am the Queen of do-it-yourself and pride myself on photographing each step of the process.
I started off with three skeins each of Noro Kureyon #95 and Noro Kureyon 209…
Noro Kureyon 95
Noro Kureyon 209
The knitting went quickly. I finished up #209 first. This is the bag that will be for the Mr.’s grandmother for Christmas. She loves jewel tones.
The bag measured 13 x 12 pre-felting
Bag #2 is for a friend who saw my personal booga bag (I use it as a regular purse) and asked me to make one for her to gift to someone. She ordered the yarn and gave it to me when it arrived.
I knit most of Bag #2 last Friday and finished it on Saturday.
This bag measured 13 x 11 pre-felting
Sunday was designated as felting day.
First of all, what is felting? Well, the easiest way to explain this is to ask a question.
Have you ever thrown a sweater in the wash and had it come out all shrunken and fuzzy?
Then you’ve felted.
100% wool is a fiber that is ideal for felting. The fibers shrink and lose their definition when they are submerged in water and agitated. What you wind up with is a small, dense product.
As you can see from my pictures above, the purses would not be very useful before felting as pens and other small items would slip through the stitches. That’s where the magic comes in.
First, I tied my bags and their handles in pillowcases. I secured them with rubber bands. This serves two purposes. First, my knit items wouldn’t get hung on the agitator…especially the strap. Second, when felting, pieces of fiber come off of the pieces. These pieces can clog the washing machine and get stuck on the other items placed in the machine. The pillowcases keep everything contained.
Each bag and corresponding strap went into its own respective case. You don’t want to mix different colored fibers.
Next, I set my washing machine’s water temperature at the hottest setting possible. I also set it for the smallest load and added a couple of pairs of blue jeans and a couple of full-sized towels. These items add friction and help items felt more quickly. One last thing I did was set the wash cycle to extra-heavy. I wanted my load to get an extra beating.
When I heard the machine start agitating, I set the stove timer for five minutes. When it went off, I took a peek…
As you can see, the stitches look almost the same as they did before I started the machine, so back in they went. I set the timer for another five minutes when I heard the agitating start.
After the timer went off, I took another look…
As you can see, the pink bag looks the same; however, the yellow bag’s stitches are starting to lose their definition. Notice the fuzz too. That’s a good indication that felting has begun in earnest.
At this point, I had to drain the washer and refill it. My power company will love me.
So, felting attempt #3 began…after I added an extra towel for more friction. I set the timer for five minutes and waited, but still no cigar.
At least the pink bag was starting to felt in earnest, although it wasn’t done. The yellow bag, however, looked like it might be finished.
I held it up against my personal bag…just to compare…
Nope…still not done. I didn’t like the way the top was flaring, and I also didn’t like that it was still a little stretchy. A felted purse should not be overly stretchy. You want stability. So, I stuck everything back in for a 4th round and five more minutes…
Looking better, but I didn’t trust my eyes, so I measured…
Yep! It was done.
I pulled it out and put the pink bag in for two more rounds of ten minutes each. At the end of 20 more minutes, it too was finished. I don’t know why that bag was so stubborn. Maybe the dye had something to do with it? I don’t know.
To get the extra water out, I placed the bags and their straps on towels and rolled them up, squeezing gently…
And now…for more fun…prepping the bags to dry.
You would think it wouldn’t be complicated, but it really is. This is an important step of the process to ensure that the booga bags maintain their shape.
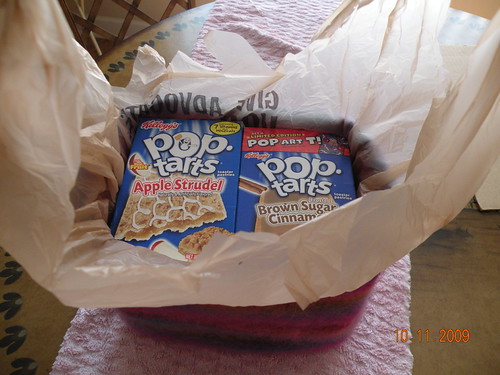
First, you need to locate something to insert into the bottom. I found a couple of things…
I wound up not liking the tea box, so I hunted for something else…finally settling on Pop Tart boxes and boxed broth…
Once I located the perfect boxes, I wrapped them in plastic bags. I wanted to protect my bags from dye leakage from the cardboard packaging…
It is important to stretch the bottom of the bags over the boxes to ensure straight edges and rectangular bottoms…
Next, I needed to fill the rest of the bags. Not only do you want the bottom to be shaped properly, but you need to maintain the line of the bag all the way to the top. I used a combination of cut pieces of cardboard and packaged food from my pantry…
Some worked, and some didn’t, as evidenced by the bulge in the sides below…
So, I had to rearrange. I like things to be just right…
Now it was time to dry! I stretched out the straps and loosely tied them to my chairs. I know, from experience, that crooked straps do stand out, and they aren’t pretty. I also turned the bags over to allow the bottoms to dry…
The bags took a couple of days to dry.
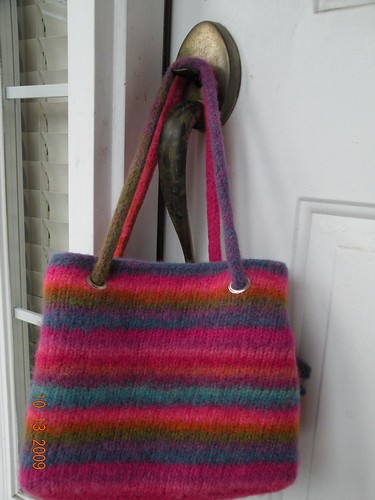
And then more fun…adding the grommets and straps! This was an experience all in itself.
I gathered my supplies…
I had already gone by Joann’s (with a 40% coupon) and purchased grommets. After fixing my sister’s bag last week, I decided that every booga bag I make will include grommets.
I prepped one bag by inserting double pointed needles where I wanted them and eyeballed it from the front and the top…
I fully expected this to be a speedy part of the process, but alas it wasn’t. I tore up two grommets before realizing that I had purchased grommets instead of eyelets.
Decision time…grommets or eyelets? I decided to buy the tool for the grommets because the eyelets I’d placed on my own bag (after fixing my sister’s) were coming off. I have another bag that I made last summer that had regular grommets. They haven’t fallen off.
Back to Joann’s I went to purchase one more package of grommets and the tool…
Insert Tim the Tool Man grunting here…
Let me just say that I LOVE this tool! It has a hole puncher that works fabulously. Turn the plastic part around, and you have the base for setting the grommet.
I will say that I ruined one more grommet, and I couldn’t figure out why. I’m AuburnChick…Goddess of Tools.
I ran to Google and found this video of how to attach grommets. It was very helpful…
Thank goodness for YouTube! I figured out that I was using the grommet pliers backwards. Go figure.
After inserting the grommet barrel right side to back…
I strung the washer on the backside, dome side up…
And then fit the silver bulb part of the tool inside the grommet barrel and squeezed…
You know the grommet is clamped properly when you see crimping…
Next, it was time to thread the handles through the holes. First, I cut the straps in half…
And then I threaded the straps through the holes…
And tied the straps at the sides…
VOILA!
But wait…I wasn’t done!
Felted projects have peach fuzz that needs to be shaved…
I went over all sides with the fabric shaver (purchased at Michael’s a couple of years ago), the bottom, and the strap of each bag…
Shaving made a HUGE difference in presentation. Look at the fuzz I removed from one bag…
What did I get when I was done?
BEAUTIFUL booga bags!!
I used 140 grams of yarn for the pink bag…
Bag #2 required 125 grams of yarn…
Notice the brass grommets? I thought they matched nicely…
Two more projects off my needles and off my dining room table! I’m a happy girl!
Do you remember my friend, Ms. Donna, the Attendance Lady? She’s the wonderful gal I worked with last Spring when I was blessed to sit at the Attendance desk for two months.
Well, today is Ms. Donna’s birthday.
I learned of it quite by accident. Well, it was probably a God-thing.
Substitute teachers receive a daily newsletter when we pick up our attendance forms each morning. The newsletters are great for informing us of school functions, suspended students, and other important information.
The newsletters also list monthly staff birthdays.
As I glanced at the list, I noticed Ms. Donna’s name, and I said to myself, “AuburnChick, you know how much you adore Ms. Donna. Now, you don’t have much money. What can you do to show her that you care for her?”
Naturally, I thought of knitting, but because I didn’t have much time, I decided to make her a couple of spa cloths.
I showed you a picture of them as they were blocking.
Because we had cooler weather for a few days, the cloths took longer than usual to dry. However, yesterday they were finally done!
The pattern is called Turn Back Time Spa Cloth, and it is from the January 2008 Creative Knitting issue.
I used Lily ‘n Cream in Yellow (above) and Cornflower (below…and my all-time favorite color in the crayon box)…
I ran to my second pantry and pulled out an orange vanilla soy candle. I thought it added a little something to the gift…
I wrapped things up…
And put everything into a pretty little bag I found with my wrapping paper…
I will be running by the school in a bit to give her the gift. I can’t wait! She’s such a special lady…the way she cares for the students and everyone she works with…that she deserves to be pampered.
Only this time it was knitting related, but I did get to pull out the hammer! You know me…gotta take every opportunity to pull out the tools!
Last week, my sister called and told me that the booga bag I’d given her for Christmas had developed two large holes, so she passed it to the Mr. when he and Chicky passed through last weekend. Here’s what it looked like…
The strange thing was that the holes were only on one side of the bag.
I pondered a fix, asked my Ravelry friends for advice, and then went into action.
I bought extra large grommets from Joann’s (using a 50% AC Moore coupon, which the store accepted)…
When I got home, I found the leftover yarn from the project (thank goodness I’d saved it). I cut off a long strand, doubled it, and used an embroidery needle to stitch around the edges of the hole.
Then I took the bag outside, grabbed the hammer from the toolbox, and proceeded to pound in four grommets…two on each side.
I am pleased with the results…
I was so inspired that I added grommets to my own bag…on which I had discovered one hole in the making.
I’ve decided that I will add grommets to all of the bags I make. Although the bags look decorative, you receive so many compliments on them that you find yourself using them more and more. In fact, my sister and I use our’s as our regular purses.
When I called her yesterday to tell her about my success, she sounded relieved. She said she had considered shopping for another purse since her’s was out of commission.
Not necessary, Sister Dear. Your purse will find its way home this weekend when the Mr. and Chicky stop back through.