On Tuesday, I received a package in the mail from Coupon Queen. If you’ll recall, Coupon Queen is my mother-in-law.
Here’s what I saw when I opened the box…
Hmmm…what was under that bubble wrap?
It was a new binder (and an envelope of coupons, of course)! She found the binder at Office Depot, and it was on clearance for a ridiculously low price…even SWEETER as we both LOVE deals!
Now, this is no ordinary binder.
It’s extra-special.
Why?
For several reasons.
First – It’s a two-inch binder.
My previous binder was only an inch thick, and I was at the point where I desperately needed a new one.
Second – It has LOADS of pockets and slots for pens!!
It looks like the following picture is a duplicate of the one above, but it’s ANOTHER pocket, on top of the other one!!
Another reason why I like this binder is because all of my pages fit with room to spare…
If When I need to add more pages, I’ll be able to expand the binder by unzipping part of it, much like a suitcase…
For now, I’ve zipped up that expandable piece because there is, as I said before, AMPLE space…
Another fantastic feature of this binder is the cloth covering. It is made of the same heavy-duty material as backpacks, so I think it will hold up well.
After getting it zipped up, I clipped on the adjustable strap…
What a fantastic product! I will be able to carry it around without fear of losing my precious coupons…
By the way, this find coincides with my friend, Tabby’s, recent search for a more workable coupon-keeper. Thanks, Tabby, for being the inspiration for my “upgrade!”
And thanks, Coupon Queen, for YOUR generosity. You are a wonderful mother-in-law who I haven’t always appreciated properly. Muah (that’s a kiss in the Internet world).
Despite my best efforts, I could not secure a subbing job for today, but no worries. I had plenty to keep me busy at home.
Well, best laid plans often change, and such was the case for me when I had the wonderful fortune of talking to a friend on the phone.
“Where are you right now?” she asked.
“Target…duh…” I said (yeah, I’m that intelligent sounding in real life).
“Wanna meet me for lunch? I have a buy one get one free coupon,” she said.
“Count me in,” I said, and she said she would pick me up at my house at an agreed-upon time.
This is where the fun began. When she arrived at my house, I saw this…our ride for the day…
Can you say MIATA! Only one of my favorite cars EVER!
And look at the sky as we drove…clear, blue, and the perfect temperature at 76 degrees…
I told her it was too bad we weren’t 20 years younger and headed to the beach. She chuckled.
We headed to a small hot dog place downtown…nearly standing room only. But we took our food outside and ate there. My chili dog was DIVINE!!
After we finished, we stopped at an antique store next door, where I spied these…
I think they are both spinning wheels (the prices certainly pointed in that direction). I couldn’t locate pedals, so I have no idea how you actually spin the fiber. Ideas, anyone?
Regardless, I was giddy with excitement because four years ago, I wouldn’t have had a clue what they were.
Then, we headed to Joann’s, where I picked up a new row counter. I lost my green one (my favorite because it locks) yesterday when I subbed. My friend and I had a good time looking around the store, getting lots of ideas for gifts.
After a quick run to Ross, we dashed into Bed, Bath, and Beyond…where I spotted this…
Yes, you’re reading the box correctly…Snuggie for Dogs. Can you believe it? Now you AND your dog can lounge around the house this winter all wrapped up in warmth and still have limbs free to do whatever you want.
If you don’t like the blue, you can pick up another color…
Too bad they don’t make them for 80 lb dogs. I would love to see Pele in a pink one (I’m so bad).
It was at this point where the fun ended. My friend’s daughter called in an SOS for swim gear, and we had to leave quickly to get it to her.
I’ll be subbing the next two days in a middle school, so I’m really glad I had this fun day to play.
You know I love my dogs. I mean, who else takes a gazillion pictures of their fur babies?
One of the things I enjoy most about having more than one furry baby is the way they interact.
Simply put, they are just like children.
Take, for instance, the game that Molly and Pele recently started.
The fun begins when Pele wakes up from a nap and decides he wants to play. He looks over at Molly, jerks his head sideways, and grunts.
What he’s asking is, “Play?”
Did you ever watch the movie “Over the Hedge,” which was in theaters in 2006? There’s a dog in that movie that asks the same question, and it’s adorable!
Naturally, I took some pictures the other night when one of their play sessions commenced…
Molly first gets the ball and jumps on the couch. Pele follows and tries to get the ball from her…
Molly is such a tease…holding it up where he can see, chewing it loudly while he watches…
And waits…
She knows what he’s up to…
And she “loses” the ball to keep the game going…
Off he runs, Molly right behind him…
Molly is sneaky, going for the under-the-belly move to snag the ball away from Pele’s paws…
With the treasured item returned to its original “owner,” Molly gives me a look that says, “Did you doubt the outcome?…
If you’ve ever been a soccer parent, you know that this is a dirty game.
Atlanta has gotten a lot of rain in recent weeks, and it showed when we took the fields.
Observe…
Chicky’s socks…
Her teammate’s were even worse…
Sorry for the poor quality. I took those with my camera phone.
My shoes took a muddy beating as well, but I managed to keep my socks dirt-free…
The good thing about this weekend is that it was Chicky’s last Premier League weekend.
What does this mean?
Well, the Florida Youth Soccer Association (FYSA) requires teams to participate in league play to qualify for State Cup (state playoffs in the Spring).
For the last five years, Chicky’s teams have participated in Premier League. This league is comprised of teams from the Southeast, so it involves a LOT of travel in the Fall. It’s been even more travel-intensive because the teams Chicky has played on during this time have been between two-and-a-half and four-and-a-half hours away. That means “home base” has been in those cities.
On the way home, I couldn’t help feel a little nostalgic…and a little relieved too.
Fortunately, we had GORGEOUS weather to accompany us. The sky was clear and the brightest blue you can imagine.
We passed many empty fields, but I spied a few filled with cotton…
Seeing the cotton reminded me of the times the kids played in a tournament that was located right beside a cotton field. When you live in the country, that’s what you get. Chicky has even played in revamped horse pastures before (we parked in makeshift, dirt-filled, hay-strewn “parking lots.” You could hear the horses naying in the barns located across from the “parking lots.”
Um, yeah.
I also saw hay…all rolled up and ready for winter…
This is the last major traveling we’ll do for a while. High school season has officially begun. Practices commence this week, and the first game will be played in a couple of weeks.
I’m looking forward to the break in traveling but will miss the scenic views.
This weekend, we’re in Atlanta, which cannot go by the nickname “Hotlanta” cause it’s FREEZING!
When we left home (i.e. Florida) at 6:30am, it was 50 degrees. My phone has a weather application, and I checked it as we traveled.
When we hit Dothan an hour and a half later, it was 47 degrees. Say what? Isn’t it supposed to warm up as the day progresses?
We hit Eufaula awhile later, and it was still hovering around 49 degrees.
Lovely.
We got out to eat in Columbus, Georgia, and the wind was blowing. And it was COLD. We didn’t dawdle.
We arrived in Atlanta around 1pm, and I’m telling you…it felt colder than an hour before. Chicky lives for cool weather, but she commented that while yesterday’s weather was nice (the temperature was just starting to fall), today was plain old cold.
Brrr…
Now, let’s talk about the hotel.
It’s the Courtyard Marriot in East Point, GA (Atlanta Airport West), and it’s FABULOUS! Oh my gosh! When we walked into our room, here’s what we saw…
The little details, such as plants, lighting, and TV/desk areas change a hotel room from passable to uber-comfy…
A nice bathroom is bonus…
Look at the shower! I LOVE the little seat area. It’s great for setting your shampoo bottles on!
Before we headed out to the field, we saw that we had time to relax, so I kicked off my shoes.
Notice anything?
Yep…a hand-knit pair of sock…of course…
These are the Hawaiian Leis Socks I finished in February. I blogged about the details here.
The little bit of lace makes the socks just a little thicker than your ordinary vanilla pattern socks, adding a warmth that I wanted for today. The yarn is super-soft.
When people see me knitting socks, they usually say one of two things:
1) Why are you making socks, when you could buy them cheaper? Well, because this way they fit ME perfectly, and they are much nicer than regular socks. Plus, they are different from any you can buy.
2) Do you really think you’re going to use all the socks you make? You live in Florida. Um, we get cold in Florida too. In fact, Floridians get cold when the temperature drops to 75 degrees.
Today I had an interview for an English teaching position. It was at a different high school from the one Chicky and Rooster attend, but hey, it was an INTERVIEW! I was psyched!
I dressed the part and got nervous when I went in. The principal and another teacher were conducting it.
They quickly put me at ease, and I answered all of their questions.
As the interview progressed, I grew confident. They seemed to like my answers, made a lot of comments, and I left feeling very good about the experience.
Well, I just got a phone call.
The job was filled with another applicant.
Sigh…
Would it be bad to say I’m disappointed?
I honestly thought I had a shot at this one.
I thought I answered all of the questions correctly. I answered from my heart…that’s all I know.
The feedback I received from them made me believe I stood an honest chance.
Most people would wallow in self-pity, though, and I’m choosing not to do that.
I think I’ll allow myself a moment and treat myself to some kind of chocolaty-caramely delight (I’m making up words, but I’m not officially an English teacher yet).
And then I’ll go back to job-hunting…continuing to trust the Lord.
His plans for me are perfect. I know He will use this experience to bring glory to His name.
It’s often the little things that make me the happiest.
Take, for instance, my recent discovery of liquid fabric softener.
You might recall that I purchased two bottles for $.99 each last week. Chicky had mentioned that she’s like to try some to help our clothes smell better.
For years, we’ve used fragrance-free detergent. Prior to hanging clothes on the line, we used dryer sheets.
I was so out-of-the-know as far as liquid softener goes that I pulled out my washing machine’s manual to make sure I poured it in the right spot.
Can I just tell you how delightful that first whiff was as I hung the clothes?
Oh my goodness!
It was so amazingly fresh.
And when the breeze blew through the garage…
Oh my goodness!
Imagine my delight when I ran to Target today and found this deal…
On clearance...got it for $2.31 after a $1.25 coupon and another deal that was a money maker.
Oh yeah, Baby, now that’s what I’m talking about!
Another thing I like…
New windshield wiper blades!
Today, when I took my car in for an oil change, I was told that my wipers were streaking the windshield.
Ya think I didn’t know that?
I only travel almost every weekend. Between the bugs and the rain, it’s a miracle I’ve been able to see out of that thing at all.
I payed the inflated price to have them replaced (I’m sure I could have done this much cheaper myself, but I was feeling lazy).
On the way home, I sort-of hoped for rain, and boy did God hear. The skies opened up, and it poured!
But, I could see out the windshield, as my new wipers did their thing…soundlessly too.
I’ve had some great questions since posting my felting tutorial yesterday.
Kelly wanted to know what the difference is between eyelets and grommets?
Glad you asked, since I just found out myself!
Eyelets have two pieces: a washer with a barrel attached (much like a grommet), and a washer with teeth…
One eyelet set
Grommets, on the other hand, have sets containing washer/barrel combos and domed washers with no teeth…
One grommet set
From what I can surmise, eyelets are useful for “grabbing” and adhering to material. Grommet parts get “smooshed” onto the items they are being attached to and adhere by being crimped together.
Kelly also asked why one of the bags required more yarn than the other.
Hmmm…I wondered that myself. I think that one reason was that the strap of one bag was shorter than the other bag.
Maybe.
I did weigh the bags before they were felted, so I know my numbers are correct.
It could be that the difference in the yardage/weight was due to the varying thickness of the yarn. Noro Kureyon is notorious for having thick and thin sections. It can take a little getting used to, but when things are felted, it really doesn’t matter a whole lot as far as appearance goes.
Another reason could be tension.
I might have had a tighter tension for the second bag (I was subbing when I knit half of it). When you knit tighter, you use less yarn…especially when you’re making multiple projects using the same pattern and are going by round count instead of measured “done-ness.” By that, I mean that I didn’t knit the bag (unfelted) to certain dimensions.
Three skeins will give you ample yarn for your project. I suggest knitting the straps a full six feet in length. It’s a pain to do i-cord for that long, but it ensures you get one suitable to hang over your shoulder.
Another reader commented that it was too bad I couldn’t sell these bags.
Yep…it is too bad, but I’m going to honor the designer’s requirements. She freely offers this pattern — at no cost to the knitter. One of the main requirements is that the project is not made for resale.
If you are looking for a place to purchase the yarn, I suggest Hook ‘n Needle. I purchased the pink Noro during one of my soccer trips to South Carolina.
The owner does not have a website, but she gladly takes phone or email orders. She is a lovely lady…does business the old way. She said she gladly ships without taking payment first. She uses the honor system and asks the buyer to add on the cost of shipping when sending payment (she includes an invoice in the package without factoring in the shipping).
Talk about trust!
Here’s the contact info for the shop:
Hook ‘n Needle
28 Diamond Lane
Intersection Center
Columbia, SC 29210
803-772 1335
One last piece of advice.
Before you begin this project, I suggest you wind all three skeins of yarn into one big yarn cake. These were the first two bags I did this for, and I found it much easier to match up the striping, tie the yarn ends together, and go from there. I stuck the yarn cake in a large, plastic storage bag and knit from there to keep dog hair off of my project.
Good luck to you and let me know if you have any questions!
But, I had good reason! I was busy finishing up a couple of projects and working on my super-secret project.
I’ve mentioned how I’m working on two Black Sheep Booga Bags. Well, I’m happy to report that they are now FINISHED! Woo Hoo! (insert happy dance)
Before I started felting them, I thought to myself…”AuburnChick, some people out there either don’t know what felting is or are too intimated to give it a try. Why don’t you show your faithful two readers (and anyone who might accidentally stumble on your blog) how it’s done?”
“Ok,” I said to myself, since not too many people tend to answer me back IRL (in real life).
WARNING: This post is VERY picture-heavy. I couldn’t help myself. I am the Queen of do-it-yourself and pride myself on photographing each step of the process.
I started off with three skeins each of Noro Kureyon #95 and Noro Kureyon 209…
Noro Kureyon 95
Noro Kureyon 209
The knitting went quickly. I finished up #209 first. This is the bag that will be for the Mr.’s grandmother for Christmas. She loves jewel tones.
The bag measured 13 x 12 pre-felting
Bag #2 is for a friend who saw my personal booga bag (I use it as a regular purse) and asked me to make one for her to gift to someone. She ordered the yarn and gave it to me when it arrived.
I knit most of Bag #2 last Friday and finished it on Saturday.
This bag measured 13 x 11 pre-felting
Sunday was designated as felting day.
First of all, what is felting? Well, the easiest way to explain this is to ask a question.
Have you ever thrown a sweater in the wash and had it come out all shrunken and fuzzy?
Then you’ve felted.
100% wool is a fiber that is ideal for felting. The fibers shrink and lose their definition when they are submerged in water and agitated. What you wind up with is a small, dense product.
As you can see from my pictures above, the purses would not be very useful before felting as pens and other small items would slip through the stitches. That’s where the magic comes in.
First, I tied my bags and their handles in pillowcases. I secured them with rubber bands. This serves two purposes. First, my knit items wouldn’t get hung on the agitator…especially the strap. Second, when felting, pieces of fiber come off of the pieces. These pieces can clog the washing machine and get stuck on the other items placed in the machine. The pillowcases keep everything contained.
Each bag and corresponding strap went into its own respective case. You don’t want to mix different colored fibers.
Next, I set my washing machine’s water temperature at the hottest setting possible. I also set it for the smallest load and added a couple of pairs of blue jeans and a couple of full-sized towels. These items add friction and help items felt more quickly. One last thing I did was set the wash cycle to extra-heavy. I wanted my load to get an extra beating.
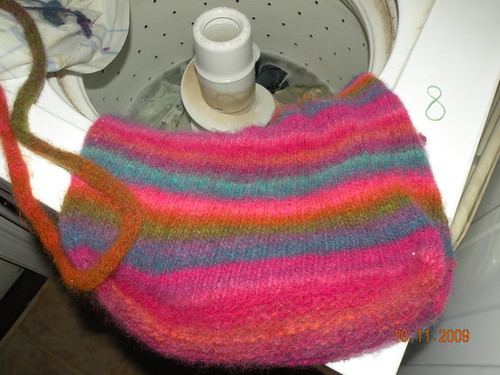
When I heard the machine start agitating, I set the stove timer for five minutes. When it went off, I took a peek…
As you can see, the stitches look almost the same as they did before I started the machine, so back in they went. I set the timer for another five minutes when I heard the agitating start.
After the timer went off, I took another look…
As you can see, the pink bag looks the same; however, the yellow bag’s stitches are starting to lose their definition. Notice the fuzz too. That’s a good indication that felting has begun in earnest.
At this point, I had to drain the washer and refill it. My power company will love me.
So, felting attempt #3 began…after I added an extra towel for more friction. I set the timer for five minutes and waited, but still no cigar.
At least the pink bag was starting to felt in earnest, although it wasn’t done. The yellow bag, however, looked like it might be finished.
I held it up against my personal bag…just to compare…
Nope…still not done. I didn’t like the way the top was flaring, and I also didn’t like that it was still a little stretchy. A felted purse should not be overly stretchy. You want stability. So, I stuck everything back in for a 4th round and five more minutes…
Looking better, but I didn’t trust my eyes, so I measured…
Yep! It was done.
I pulled it out and put the pink bag in for two more rounds of ten minutes each. At the end of 20 more minutes, it too was finished. I don’t know why that bag was so stubborn. Maybe the dye had something to do with it? I don’t know.
To get the extra water out, I placed the bags and their straps on towels and rolled them up, squeezing gently…
And now…for more fun…prepping the bags to dry.
You would think it wouldn’t be complicated, but it really is. This is an important step of the process to ensure that the booga bags maintain their shape.
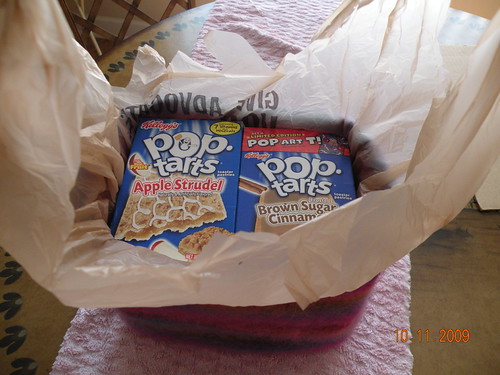
First, you need to locate something to insert into the bottom. I found a couple of things…
I wound up not liking the tea box, so I hunted for something else…finally settling on Pop Tart boxes and boxed broth…
Once I located the perfect boxes, I wrapped them in plastic bags. I wanted to protect my bags from dye leakage from the cardboard packaging…
It is important to stretch the bottom of the bags over the boxes to ensure straight edges and rectangular bottoms…
Next, I needed to fill the rest of the bags. Not only do you want the bottom to be shaped properly, but you need to maintain the line of the bag all the way to the top. I used a combination of cut pieces of cardboard and packaged food from my pantry…
Some worked, and some didn’t, as evidenced by the bulge in the sides below…
So, I had to rearrange. I like things to be just right…
Now it was time to dry! I stretched out the straps and loosely tied them to my chairs. I know, from experience, that crooked straps do stand out, and they aren’t pretty. I also turned the bags over to allow the bottoms to dry…
The bags took a couple of days to dry.
And then more fun…adding the grommets and straps! This was an experience all in itself.
I gathered my supplies…
I had already gone by Joann’s (with a 40% coupon) and purchased grommets. After fixing my sister’s bag last week, I decided that every booga bag I make will include grommets.
I prepped one bag by inserting double pointed needles where I wanted them and eyeballed it from the front and the top…
I fully expected this to be a speedy part of the process, but alas it wasn’t. I tore up two grommets before realizing that I had purchased grommets instead of eyelets.
Decision time…grommets or eyelets? I decided to buy the tool for the grommets because the eyelets I’d placed on my own bag (after fixing my sister’s) were coming off. I have another bag that I made last summer that had regular grommets. They haven’t fallen off.
Back to Joann’s I went to purchase one more package of grommets and the tool…
Insert Tim the Tool Man grunting here…
Let me just say that I LOVE this tool! It has a hole puncher that works fabulously. Turn the plastic part around, and you have the base for setting the grommet.
I will say that I ruined one more grommet, and I couldn’t figure out why. I’m AuburnChick…Goddess of Tools.
I ran to Google and found this video of how to attach grommets. It was very helpful…
Thank goodness for YouTube! I figured out that I was using the grommet pliers backwards. Go figure.
After inserting the grommet barrel right side to back…
I strung the washer on the backside, dome side up…
And then fit the silver bulb part of the tool inside the grommet barrel and squeezed…
You know the grommet is clamped properly when you see crimping…
Next, it was time to thread the handles through the holes. First, I cut the straps in half…
And then I threaded the straps through the holes…
And tied the straps at the sides…
VOILA!
But wait…I wasn’t done!
Felted projects have peach fuzz that needs to be shaved…
I went over all sides with the fabric shaver (purchased at Michael’s a couple of years ago), the bottom, and the strap of each bag…
Shaving made a HUGE difference in presentation. Look at the fuzz I removed from one bag…
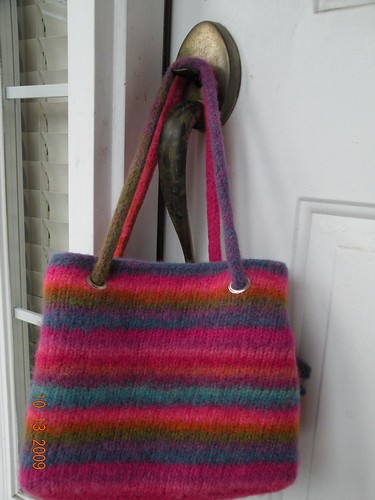
What did I get when I was done?
BEAUTIFUL booga bags!!
I used 140 grams of yarn for the pink bag…
Bag #2 required 125 grams of yarn…
Notice the brass grommets? I thought they matched nicely…
Two more projects off my needles and off my dining room table! I’m a happy girl!